How do I uninstall eMule?
How can I reinstall it without losing my downloads and configuration?
If, for whatever reason, your eMule has stopped working and the only solution you can see is to uninstall and reinstall it, here is a set of simple instructions that will let you do just that without losing your configuration. What’s more, you won’t lose any of your downloads, whether they are completed or not.
First of all, we should make a note of the current eMule configuration that is causing us problems.
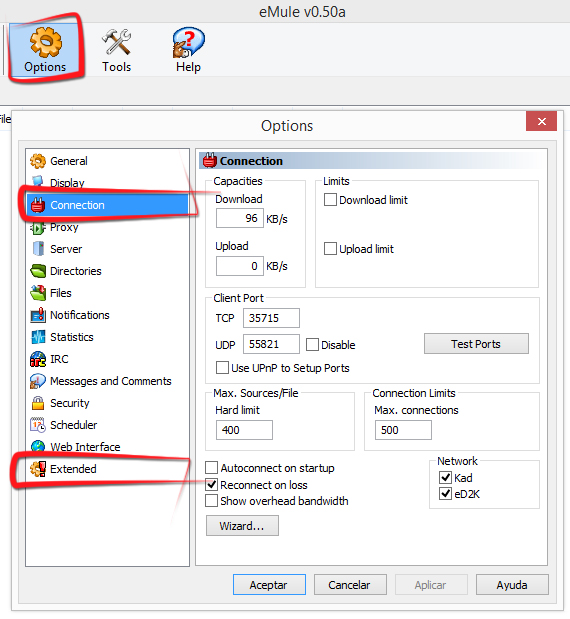
Open the Options tab and click on Connection:
-
Selected Client Ports:
Make a note of the TCP and UDP port numbers.
-
On the same screen, make a note of the following:
Hard Limit and Max. connections.
-
Still in Options, open the Directories tab and make a note of the following:
- The default Incoming Files route *C:\Program Files\eMule\incoming
- The default Temporary Files route * C:\Program Files\eMule\Temp
-
Still in Options, open the Extended tab and make a note of the option you have selected for Sharing eMule with other computer users.
The next step is to save both our completed and incomplete downloads. To do this:
-
Create a new Desktop folder where we will temporarily save our current shared files and downloads.
Locate the incoming and temporary file folders shown in step 3 and select, cut and paste these folders into the folder you just created in the previous step.
Now you have a security copy.
Now we will begin the eMule uninstall process
-
Open the Control Panel and, according to your Windows version, do one of the following:
- Windows XP, select Add and Remove Programs.
- Windows Vista and Windows 7, select Programs and Characteristics.
- Windows 8, in the Search box enter Uninstall Programs.
In the screen that appears, find and select eMule and press Uninstall then follow the instructions. You have now uninstalled eMule.
Now we have to download and install eMule
Proceed with downloading the latest version of eMule
-
Downloading eMule from www.emule.co.uk ensures a virus-free download.
-
Once you click on Download the process will start automatically and once the download has completed, the installation process will begin. When you come to the window that asks you for the option Sharing eMule with other computer users, select the option you made a note of in step 4.
-
In the following step we will be asked for the program installation folder which, by default is C:\Program Files\eMule. Finally the files will be copied and our eMule installation is complete.
-
Once the installation has finished, and before starting eMule, we should return the folders which we cut and pasted in step 5 to their original location.
-
Once the folders have been returned to their original location we can start eMule normally. When you start up a newly installed version of eMule it will automatically open a Configuration Wizard which we will Cancel, as we are going to configure the program manually.
-
When eMule starts, and without selecting Connect, we will go to the Options tab, then Connection, then enter the values we made a note of in steps 1 and 2.
-
Following this, we will do the same for the information in the Directories and Extended tabs.
-
We’re almost there! Restart eMule - we suggest you update your list of servers – now you’re ready to start downloading!
 English
 Spanish
  French
  German
  Italian
 ") Portuguese (Brazil)
Portuguese (Brazil)  Linux
Linux